RemoteIoT Behind Router Example in Raspberry Pi: A Comprehensive Guide
RemoteIoT technology has revolutionized the way we interact with devices remotely, especially when it comes to home automation and IoT projects. Using a Raspberry Pi as the backbone of your RemoteIoT setup is a popular choice due to its affordability and versatility. If you're looking to set up a RemoteIoT system behind a router using a Raspberry Pi, this guide will walk you through everything you need to know.
As the Internet of Things (IoT) continues to grow, the ability to control devices remotely becomes increasingly important. Whether you're managing a smart home, monitoring environmental conditions, or automating industrial processes, understanding how to configure your Raspberry Pi for RemoteIoT behind a router is crucial.
This article will cover everything from basic setup to advanced configurations, ensuring that you have a robust and secure RemoteIoT system. By the end of this guide, you'll be equipped with the knowledge to create your own RemoteIoT solution using Raspberry Pi, even if your device is behind a router.
Introduction to RemoteIoT
RemoteIoT refers to the ability to control and monitor IoT devices from a distance. This technology allows users to interact with their devices regardless of physical location, making it ideal for applications such as home automation, remote monitoring, and industrial automation.
With the increasing demand for smart solutions, RemoteIoT has become an essential component of modern technology. By leveraging the power of the Raspberry Pi, users can create cost-effective and scalable IoT systems that operate seamlessly behind a router.
RemoteIoT behind router involves configuring your network to allow external access to devices located within a local network. This setup requires careful planning and execution to ensure both functionality and security.
Raspberry Pi Overview
The Raspberry Pi is a credit-card-sized single-board computer that has gained immense popularity in the maker community. It is powered by an ARM processor and comes with various ports for connectivity, including USB, HDMI, and Ethernet.
Some key features of the Raspberry Pi include:
- Low cost and energy-efficient
- Highly customizable and versatile
- Supports a wide range of operating systems
- Perfect for IoT projects and automation
For RemoteIoT applications, the Raspberry Pi serves as the central hub that connects all devices and facilitates communication between them.
RemoteIoT Behind Router
Understanding Network Configuration
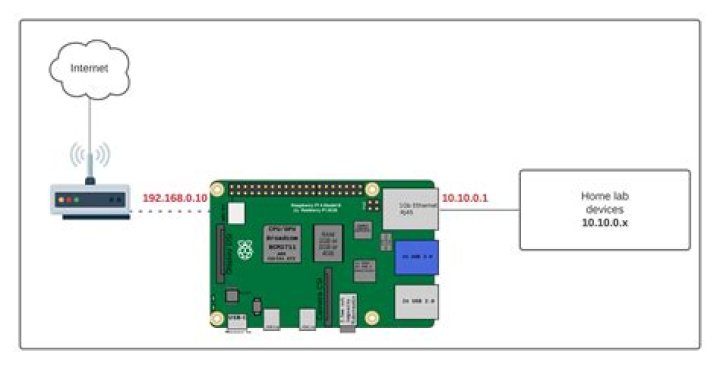
When setting up a RemoteIoT system behind a router, it's important to understand how network configuration works. Routers act as gatekeepers, managing traffic between the local network and the internet. To access your Raspberry Pi from outside the local network, you need to configure your router to allow external connections.
Key Components
The main components involved in setting up RemoteIoT behind a router include:
- Router: Manages network traffic and assigns IP addresses.
- Raspberry Pi: Acts as the central device for IoT communication.
- Network Interface: Connects the Raspberry Pi to the router, either via Ethernet or Wi-Fi.
By properly configuring these components, you can create a secure and reliable RemoteIoT setup.
Setup Steps for Raspberry Pi
Setting up your Raspberry Pi for RemoteIoT involves several steps. Below is a detailed guide to help you through the process:
Step 1: Install the Operating System
Begin by installing an operating system on your Raspberry Pi. For IoT applications, Raspberry Pi OS is a popular choice due to its stability and compatibility with various software.
Step 2: Configure Network Settings
Ensure that your Raspberry Pi is connected to the router either via Ethernet or Wi-Fi. Assign a static IP address to the Raspberry Pi to avoid IP conflicts and ensure consistent connectivity.
Step 3: Install Necessary Software
Install software such as Node-RED or MQTT to facilitate communication between devices. These tools provide a user-friendly interface for managing IoT projects.
Port Forwarding for RemoteIoT
Port forwarding is a crucial step in setting up RemoteIoT behind a router. It allows you to direct external traffic to specific devices within your local network.
To configure port forwarding:
- Log in to your router's admin panel.
- Locate the port forwarding settings.
- Specify the external port and map it to the Raspberry Pi's internal IP address.
For example, if you're using an MQTT server, you might forward port 1883 to the Raspberry Pi's IP address.
Security Considerations
Security is paramount when setting up RemoteIoT behind a router. Here are some best practices to ensure the safety of your system:
- Use strong passwords for all devices and accounts.
- Enable encryption for data transmission using protocols like SSL/TLS.
- Regularly update your software and firmware to patch vulnerabilities.
By following these guidelines, you can protect your RemoteIoT system from potential threats.
Troubleshooting Common Issues
Even with careful planning, issues may arise during setup. Below are some common problems and their solutions:
- Connection Issues: Check your network settings and ensure that the Raspberry Pi has a stable connection to the router.
- Port Forwarding Not Working: Verify that the port forwarding rules are correctly configured in your router's admin panel.
- Security Alerts: Review your security settings and ensure that all devices are protected with strong authentication methods.
Addressing these issues promptly will help maintain the functionality of your RemoteIoT system.
Tools and Software for RemoteIoT
Several tools and software can enhance your RemoteIoT setup. Some popular options include:
- Node-RED: A visual programming tool for wiring together hardware devices, APIs, and online services.
- MQTT: A lightweight messaging protocol ideal for IoT applications.
- Home Assistant: An open-source platform for home automation that integrates with various devices.
These tools provide the flexibility and functionality needed for advanced RemoteIoT projects.
Real-World Examples of RemoteIoT
RemoteIoT has numerous real-world applications. Below are a few examples:
- Smart Home Automation: Control lighting, temperature, and security systems remotely.
- Environmental Monitoring: Monitor air quality, temperature, and humidity levels in real-time.
- Industrial Automation: Manage machinery and production processes from a central location.
These examples demonstrate the versatility and potential of RemoteIoT technology.
Conclusion
In conclusion, setting up a RemoteIoT system behind a router using a Raspberry Pi is a powerful way to enhance your IoT capabilities. By following the steps outlined in this guide, you can create a secure and functional RemoteIoT setup that meets your needs.
We encourage you to share your experiences and insights in the comments section below. Additionally, feel free to explore other articles on our site for more information on IoT and related technologies. Together, let's build a smarter, more connected world!
References:
